Showing posts with label hacks. Show all posts

Monday, March 26, 2007

Upgrading TrueCrypt

On March 19, 2007, TrueCrypt version 4.3 is released. There are many new features, improvements and bug fixes in this release, so I think it is the time to upgrade my installation.

I downloaded the TrueCrypt package, but they only provide for OpenSUSE 10.2 system. Last time I used the RPM version, it complained about kernel mismatch. But this time it didn't complain.

Unfortunately, I already have TrueCrypt installed from source package. So I need to remove that first before I install the newer version. To make matter worse, the TrueCrypt package doesn't come with uninstaller, I need to read the installer script and reverse the installation process to create an uninstallation script. This uninstalation script is very simple : it will remove three files that have been installed by the installation script.

Without further talk, you can download the uninstaller script here.

To remove your previous TrueCrypt that you compile yourself, just type the following command :

# ./remove-truecrypt.sh

And you're done.

Thursday, March 15, 2007

Upgrading to PHP 5.2.x

I have been planning to upgrade my PHP to version 5.2.1 since several weeks ago, but I couldn't find spare time to do that until last night.

I upgraded the following packages (libedit is a new install) :

# rpm -Uvh php5-5.2.1-15.1.i586.rpm apache2-mod_php5-5.2.1-15.1.i586.rpm php5-gd-5.2.1-15.1.i586.rpm php5-mysql-5.2.1-15.1.i586.rpm php5-zlib-5.2.1-15.1.i586.rpm php5-pdo-5.2.1-15.2.i586.rpm php5-fastcgi-5.2.1-15.2.i586.rpm libedit-2.10.snap20061228-6.1.i586.rpm

After successfully upgraded those packages, I started my Apache webserver :
# rcapache2 start


Then I launched my browser and access the test file (index.php). The content only contains phpinfo() function.

Unfortunately, I can only see blank page.

I checked the error log and access log, but I can't find the error messages.

Next I check the PHP configuration (/etc/php5/apache/php.ini).

After looking through the configuration file around 11%, I found out what is the cause of this error. It looks like the new configuration turn-off the short_open_tag.


There are two things that I can do to fix this :

- I can turn on the short_open_tag config by setting :

short_open_tag = On

or

- I can change my PHP code to use the recommended open tag ("
After edited my PHP code, I restarted Apache server :

# rcapache2 restart

And now here is my PHP test page :


BTW, I just knew that this version is come with Suhosin. Yihaaa.

Tuesday, March 13, 2007

Running A Linux System on A Windows Machine

If you want to run a Linux system on Windows platform but you don't want to deal with partitioning and formatting the harddisk, fortunately you can do so with QEMU.


Here is an official information about QEMU :

QEMU is a generic and open source machine emulator and virtualizer.

When used as a machine emulator, QEMU can run OSes and programs made for one machine (e.g. an ARM board) on a different machine (e.g. your own PC). By using dynamic translation, it achieves very good performances.

When used as a virtualizer, QEMU achieves near native performances by executing the guest code directly on the host CPU. A host driver called the QEMU accelerator (also known as KQEMU) is needed in this case. The virtualizer mode requires that both the host and guest machine use x86 compatible processors.

Interested ?

If yes, just download the QEMU package for Windows. As of today, the latest version is 0.9.0.

After successfully download the package, just extract it to a drive (C, D, or whatever you like) and it will create a folder automatically.

Next you need a Linux system in ISO format. The above package already included a small Linux system. To test it just run qemu-win.bat in command line. I leave the procedure for this as an exercise for the reader. :D

In this blog, I am going to use Network Security Toolkit ISO image in QEMU. You can use other Linux system if you want.

Here is the step to boot to NST ISO from QEMU :
  • Store the Linux image file in the same folder as QEMU. This is only for ease of use. :D
  • Edit the qemu-win.bat file to the following :
  • Run the qemu-win.bat file by typing :
qemu-win
  • It will then display the following :

We've managed to run a Linux system on Windows.

Happy QEMU-ing.

Thursday, February 22, 2007

Malicious JS Could Alter DNS Settings on Routers

I just found out the following news :

Malicious JavaScript placed on web sites could be used to change DNS settings on home routers that are still using default passwords. Once the change has been made, the next time the router is rebooted, the user would be redirected to spoofed, possibly malicious web sites. Research indicates than about half of router owners have not changed the password from the default.
You can find the technical details at Symantec's site.

Thursday, February 15, 2007

Using Snort as a simple IDS

In my previous blog (Testing Snort 2.7.0 Beta 1) , I described about my endeavour to install Snort 2.7.0Beta1. After successfully install Snort, I want to create a simple IDS rule and use my Snort as a simple IDS.

To test Snort as an IDS, first I created a simple rule like the following :


Then I started Snort using the following command :


I open up another Konsole, and ping localhost :


In Snort window, I press Ctrl-C. Snort will appear as not responding to Ctrl-C, but in fact it's waiting for the first packet.

In other Konsole, I ping the localhost again :


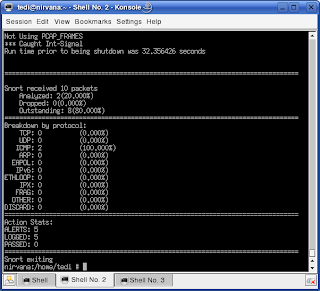
In Snort window, the display will be like the following :


You can see that Snort is actually responding to our Ctrl-C press after it received the first packet matching its rules.

From the figure above, we can see that Snort received 10 packets and it analyzed 2 (two) ICMP packets. Those packets generated 5 alerts and 5 log entries.

In the tests/ directory we can see that Snort has created two files :


And here is the alert file contents :


Our Snort has analyzed ICMP packets according to the rule we've created.

Friday, January 26, 2007

Testing Snort 2.7.0 Beta 1

After reading a news from Snort website, I grab the latest beta version of Snort 2.7.0 beta1.

Then I build the RPM packages from it using the following command :

$ rpmbuild --with mysql -ta snort-2.7.0.beta1.tar.gz

Next, I install it to my system :

# rpm -Fvh rpms/RPMS/i586/snort-2.7.0.beta1-1.i586.rpm \
rpms/RPMS/i586/snort-mysql-2.7.0.beta1-1.i586.rpm

Preparing... ########################################### [100%]
1:snort warning: /etc/snort/sid-msg.map created as /etc/snort/sid-msg.map.rpmnew
warning: /etc/snort/snort.conf created as /etc/snort/snort.conf.rpmnew
########################################### [ 50%]
2:snort-mysql ########################################### [100%]

I rename the existing conf file and the new one :

# cd /etc/snort/
# mv snort.conf snort.conf.old
# mv snort.conf.rpmnew snort.conf

I do self-test for the new snort :

# snort -T -c /etc/snort/snort.conf
Running in Test mode with config file: /etc/snort/snort.conf
Running in IDS mode

--== Initializing Snort ==--
Initializing Output Plugins!
Var 'any_ADDRESS' defined, value len = 15 chars, value = 0.0.0.0/0.0.0.0
Var 'lo_ADDRESS' defined, value len = 19 chars, value = 127.0.0.0/255.0.0.0
Initializing Preprocessors!
Initializing Plug-ins!
Parsing Rules file /etc/snort/snort.conf

...

--== Initialization Complete ==--

,,_ -*> Snort! <*-
o" )~ Version 2.7.0.beta1 (Build 7) i386
'''' By Martin Roesch & The Snort Team: http://www.snort.org/team.html
(C) Copyright 1998-2006 Sourcefire Inc., et al.

Rules Engine: SF_SNORT_DETECTION_ENGINE Version 1.6
Preprocessor Object: SF_SSH Version 1.0
Preprocessor Object: SF_SMTP Version 1.0
Preprocessor Object: SF_DNS Version 1.0
Preprocessor Object: SF_FTPTELNET Version 1.0
Preprocessor Object: SF_DCERPC Version 1.0

Snort sucessfully loaded all rules and checked all rule chains!
Frag3 statistics:
Total Fragments: 0
Frags Reassembled: 0
Discards: 0
Memory Faults: 0
Timeouts: 0
Overlaps: 0
Anomalies: 0
Alerts: 0
FragTrackers Added: 0
FragTrackers Dumped: 0
FragTrackers Auto Freed: 0
Frag Nodes Inserted: 0
Frag Nodes Deleted: 0
===============================================================================
Final Flow Statistics
,----[ FLOWCACHE STATS ]----------
Memcap: 10485760 Overhead Bytes 16400 used(%0.156403)/blocks (16400/1)
Overhead blocks: 1 Could Hold: (0)
IPV4 count: 0 frees: 0
low_time: 0, high_time: 0, diff: 0h:00:00s
finds: 0 reversed: 0(%0.000000)
find_success: 0 find_fail: 0
percent_success: (%0.000000) new_flows: 0
Snort exiting

I hope I have spare time to test the new processor.

Testing Snort 2.6.x

Download the latest snort tarball, then I create snort RPMS :

$ rpmbuild -tb snort-2.6.x.tar.gz --with mysql
...
Wrote: /home/tedi/rpms/RPMS/i586/snort-2.6.x-1.i586.rpm
Wrote: /home/tedi/rpms/RPMS/i586/snort-mysql-2.6.x-1.i586.rpm
...

Next, I registered to Snort community to be able to download Snort rules.

Then I extract the rules and move all of the files in rules/ directory to /etc/snort/rules directory :

# mv rules/* /etc/snort/rules/

# mv /etc/snort/rules/sid-msg.map /etc/snort/

I found out that there are two snort.conf files. The first one from the RPM package and the other one from the rule file. I want to check what are the differences between them :

$ diff /etc/snort/snort.conf /etc/snort/rules/snort.conf

2c2
< # http://www.snort.org Snort 2.6.0 config file --- > # http://www.snort.org Snort current Ruleset
5c5
< # $Id$ --- > # $Id: snort.conf,v 1.167 2006/06/09 15:14:08 mwatchinski Exp $
111c111
<> var RULE_PATH ../rules
182c182
<> dynamicpreprocessor directory /usr/local/lib/snort_dynamicpreprocessor/
192c192
<> dynamicengine /usr/local/lib/snort_dynamicengine/libsf_engine.so
852c852
<> # include $RULE_PATH/virus.rules
855a856
> # include $RULE_PATH/spyware-put.rules

Most of the differences are related to path. The last difference is very interesting, the new snort.conf commented out virus.rules and spyware-put.rules

Then I test my snort configuration :

# snort -T -c /etc/snort/snort.conf
Running in Test mode with config file: /etc/snort/snort.conf
Running in IDS mode

--== Initializing Snort ==--
Initializing Output Plugins!
Initializing Preprocessors!
Initializing Plug-ins!
Parsing Rules file /etc/snort/snort.conf

...

--== Initialization Complete ==--

,,_ -*> Snort! <*- o" )~ Version 2.6.0 (Build 59) i386 '''' By Martin Roesch & The Snort Team: http://www.snort.org/team.html (C) Copyright 1998-2006 Sourcefire Inc., et al. Rules Engine: SF_SNORT_DETECTION_ENGINE Version 1.5
Preprocessor Object: SF_SMTP Version 1.0
Preprocessor Object: SF_FTPTELNET Version 1.0

Snort sucessfully loaded all rules and checked all rule chains!
Frag3 statistics:
Total Fragments: 0
Frags Reassembled: 0
Discards: 0
Memory Faults: 0
Timeouts: 0
Overlaps: 0
Anomalies: 0
Alerts: 0
FragTrackers Added: 0
FragTrackers Dumped: 0
FragTrackers Auto Freed: 0
Frag Nodes Inserted: 0
Frag Nodes Deleted: 0
===============================================================================
Final Flow Statistics
,----[ FLOWCACHE STATS ]----------
Memcap: 10485760 Overhead Bytes 16400 used(%0.156403)/blocks (16400/1)
Overhead blocks: 1 Could Hold: (0)
IPV4 count: 0 frees: 0
low_time: 0, high_time: 0, diff: 0h:00:00s
finds: 0 reversed: 0(%0.000000)
find_success: 0 find_fail: 0
percent_success: (%0.000000) new_flows: 0
Snort exiting

Friday, January 12, 2007

Compile Atheros Driver in OpenSUSE 10.x

I just bought an atheros-based card, it's a NetGear WPN511. For this card, I can use madwifi as its driver.

At madwifi site, they also provide the RPM for OpenSUSE, but I sometime like to compile the software myself, so I can adjust it to my needs.

Without further ado, here are the steps to compile the driver :

- extract the tarball :

$ tar xvjpf madwifi-0.9.2.1.tar.bz2

- build the driver :

$ cd madwifi-0.9.2.1/
$ make
Checking requirements... ok.
Checking kernel configuration... ok.
make -C /lib/modules/2.6.16.13-4-default/build SUBDIRS=/home/tedi/madwifi-0.9.2.1 modules
make[1]: Entering directory `/usr/src/linux-2.6.16.13-4-obj/i386/default'
make -C ../../../linux-2.6.16.13-4 O=../linux-2.6.16.13-4-obj/i386/default modules
CC [M] /home/tedi/madwifi-0.9.2.1/ath/ah_osdep.o
HOSTCC /home/tedi/madwifi-0.9.2.1/ath/uudecode
UUDECODE /home/tedi/madwifi-0.9.2.1/ath/i386-elf.hal.o
CC [M] /home/tedi/madwifi-0.9.2.1/ath/if_ath.o
CC [M] /home/tedi/madwifi-0.9.2.1/ath/if_ath_pci.o
LD [M] /home/tedi/madwifi-0.9.2.1/ath/ath_pci.o
LD [M] /home/tedi/madwifi-0.9.2.1/ath/ath_hal.o
CC [M] /home/tedi/madwifi-0.9.2.1/ath_rate/sample/sample.o
LD [M] /home/tedi/madwifi-0.9.2.1/ath_rate/sample/ath_rate_sample.o
CC [M] /home/tedi/madwifi-0.9.2.1/net80211/if_media.o
CC [M] /home/tedi/madwifi-0.9.2.1/net80211/ieee80211.o
CC [M] /home/tedi/madwifi-0.9.2.1/net80211/ieee80211_beacon.o
CC [M] /home/tedi/madwifi-0.9.2.1/net80211/ieee80211_crypto.o
CC [M] /home/tedi/madwifi-0.9.2.1/net80211/ieee80211_crypto_none.o
CC [M] /home/tedi/madwifi-0.9.2.1/net80211/ieee80211_input.o
CC [M] /home/tedi/madwifi-0.9.2.1/net80211/ieee80211_node.o
CC [M] /home/tedi/madwifi-0.9.2.1/net80211/ieee80211_output.o
CC [M] /home/tedi/madwifi-0.9.2.1/net80211/ieee80211_power.o
CC [M] /home/tedi/madwifi-0.9.2.1/net80211/ieee80211_proto.o
CC [M] /home/tedi/madwifi-0.9.2.1/net80211/ieee80211_scan.o
CC [M] /home/tedi/madwifi-0.9.2.1/net80211/ieee80211_wireless.o
CC [M] /home/tedi/madwifi-0.9.2.1/net80211/ieee80211_linux.o
CC [M] /home/tedi/madwifi-0.9.2.1/net80211/ieee80211_monitor.o
CC [M] /home/tedi/madwifi-0.9.2.1/net80211/ieee80211_acl.o
CC [M] /home/tedi/madwifi-0.9.2.1/net80211/ieee80211_crypto_ccmp.o
CC [M] /home/tedi/madwifi-0.9.2.1/net80211/ieee80211_scan_ap.o
CC [M] /home/tedi/madwifi-0.9.2.1/net80211/ieee80211_scan_sta.o
CC [M] /home/tedi/madwifi-0.9.2.1/net80211/ieee80211_crypto_tkip.o
CC [M] /home/tedi/madwifi-0.9.2.1/net80211/ieee80211_crypto_wep.o
CC [M] /home/tedi/madwifi-0.9.2.1/net80211/ieee80211_xauth.o
LD [M] /home/tedi/madwifi-0.9.2.1/net80211/wlan.o
LD [M] /home/tedi/madwifi-0.9.2.1/net80211/wlan_wep.o
LD [M] /home/tedi/madwifi-0.9.2.1/net80211/wlan_tkip.o
LD [M] /home/tedi/madwifi-0.9.2.1/net80211/wlan_ccmp.o
LD [M] /home/tedi/madwifi-0.9.2.1/net80211/wlan_acl.o
LD [M] /home/tedi/madwifi-0.9.2.1/net80211/wlan_xauth.o
LD [M] /home/tedi/madwifi-0.9.2.1/net80211/wlan_scan_sta.o
LD [M] /home/tedi/madwifi-0.9.2.1/net80211/wlan_scan_ap.o
Building modules, stage 2.
MODPOST
CC /home/tedi/madwifi-0.9.2.1/ath/ath_hal.mod.o
LD [M] /home/tedi/madwifi-0.9.2.1/ath/ath_hal.ko
CC /home/tedi/madwifi-0.9.2.1/ath/ath_pci.mod.o
LD [M] /home/tedi/madwifi-0.9.2.1/ath/ath_pci.ko
CC /home/tedi/madwifi-0.9.2.1/ath_rate/sample/ath_rate_sample.mod.o
LD [M] /home/tedi/madwifi-0.9.2.1/ath_rate/sample/ath_rate_sample.ko
CC /home/tedi/madwifi-0.9.2.1/net80211/wlan.mod.o
LD [M] /home/tedi/madwifi-0.9.2.1/net80211/wlan.ko
CC /home/tedi/madwifi-0.9.2.1/net80211/wlan_acl.mod.o
LD [M] /home/tedi/madwifi-0.9.2.1/net80211/wlan_acl.ko
CC /home/tedi/madwifi-0.9.2.1/net80211/wlan_ccmp.mod.o
LD [M] /home/tedi/madwifi-0.9.2.1/net80211/wlan_ccmp.ko
CC /home/tedi/madwifi-0.9.2.1/net80211/wlan_scan_ap.mod.o
LD [M] /home/tedi/madwifi-0.9.2.1/net80211/wlan_scan_ap.ko
CC /home/tedi/madwifi-0.9.2.1/net80211/wlan_scan_sta.mod.o
LD [M] /home/tedi/madwifi-0.9.2.1/net80211/wlan_scan_sta.ko
CC /home/tedi/madwifi-0.9.2.1/net80211/wlan_tkip.mod.o
LD [M] /home/tedi/madwifi-0.9.2.1/net80211/wlan_tkip.ko
CC /home/tedi/madwifi-0.9.2.1/net80211/wlan_wep.mod.o
LD [M] /home/tedi/madwifi-0.9.2.1/net80211/wlan_wep.ko
CC /home/tedi/madwifi-0.9.2.1/net80211/wlan_xauth.mod.o
LD [M] /home/tedi/madwifi-0.9.2.1/net80211/wlan_xauth.ko
make[1]: Leaving directory `/usr/src/linux-2.6.16.13-4-obj/i386/default'
make -C ./tools all || exit 1
make[1]: Entering directory `/home/tedi/madwifi-0.9.2.1/tools'
gcc -o athstats -g -O2 -Wall -include ../include/compat.h -I. -I../hal -I.. -I../ath athstats.c
gcc -o 80211stats -g -O2 -Wall -include ../include/compat.h -I. -I../hal -I.. 80211stats.c
gcc -o athkey -g -O2 -Wall -include ../include/compat.h -I. -I../hal -I.. athkey.c
gcc -o athchans -g -O2 -Wall -include ../include/compat.h -I. -I../hal -I.. athchans.c
gcc -o athctrl -g -O2 -Wall -include ../include/compat.h -I. -I../hal -I.. athctrl.c
gcc -o athdebug -g -O2 -Wall -include ../include/compat.h -I. -I../hal -I.. athdebug.c
gcc -o 80211debug -g -O2 -Wall -include ../include/compat.h -I. -I../hal -I.. 80211debug.c
gcc -o wlanconfig -g -O2 -Wall -include ../include/compat.h -I. -I../hal -I.. wlanconfig.c
make[1]: Leaving directory `/home/tedi/madwifi-0.9.2.1/tools'

After that I install the driver to the system using "make install".

Then I put the card in the PCMCIA slot, and do "dmesg" :

ath_hal: module not supported by Novell, setting U taint flag.
ath_hal: 0.9.17.2 (AR5210, AR5211, AR5212, RF5111, RF5112, RF2413, RF5413)
wlan: module not supported by Novell, setting U taint flag.

wlan: 0.8.4.2 (0.9.2.1)

ath_rate_sample: module not supported by Novell, setting U taint flag.

ath_rate_sample: 1.2 (0.9.2.1)

ath_pci: module not supported by Novell, setting U taint flag.

ath_pci: 0.9.4.5 (0.9.2.1)

PCI: Enabling device 0000:03:00.0 (0000 -> 0002)

ACPI: PCI Interrupt 0000:03:00.0[A] -> Link [C0C4] -> GSI 10 (level, low) -> IRQ 10

wifi0: 11b rates: 1Mbps 2Mbps 5.5Mbps 11Mbps

wifi0: 11g rates: 1Mbps 2Mbps 5.5Mbps 11Mbps 6Mbps 9Mbps 12Mbps 18Mbps
24Mbps 36Mbp 48Mbps 54Mbps

wifi0: turboG rates: 6Mbps 12Mbps 18Mbps 24Mbps 36Mbps 48Mbps 54Mbps

wifi0: H/W encryption support: WEP AES AES_CCM TKIP

wifi0: mac 7.9 phy 4.5 radio 5.6

wifi0: Use hw queue 1 for WME_AC_BE traffic

wifi0: Use hw queue 0 for WME_AC_BK traffic

wifi0: Use hw queue 2 for WME_AC_VI traffic

wifi0: Use hw queue 3 for WME_AC_VO traffic

wifi0: Use hw queue 8 for CAB traffic

wifi0: Use hw queue 9 for beacons

wlan_scan_sta: module not supported by Novell, setting U taint flag.

wifi0: Atheros 5212: mem=0x38000000, irq=10


From the information above, I know that my wifi card is detected and the driver is working.

In the next post, I will describe some simple wireless activities.

Thursday, January 11, 2007

Running IE on Linux

If you have time to spare, you may want to look at the IEs4Linux site.

You may want to ask, what is IEs4Linux. Here is the answer I took from the webpage :

IEs4Linux is the simpler way to have Microsoft Internet Explorer running on Linux (or any OS running Wine).

No clicks needed. No boring setup processes. No Wine complications. Just one easy script and you'll get three IE versions to test your Sites. And it's free and open source.

The stable version only supports IE 5, 5.5, and 6. If you want to try IE 7, you may want to take a look at WebExpose article "Internet Explore 7 On Linux" first. IE7 is supported in IEs4Linux beta version. So beware.

If you have tried it, please let me know. Because I don't think I will be running IE on Linux in the near future. I better stick with other browsers. :D

Wednesday, December 13, 2006

Customizing SLAX - part 2

Continuing my adventure on customizing SLAX, in this installment I want to modify existing SLAX module. The target module is 01_kernel.mo.

Here are the steps I took to unpack the module :

- Install squashfs kernel module. I got a pre-compiled kernel module
(squashfs-kmp-default-3.0_2.6.16.12_3-0.rs.200605040428.i586) for OpenSUSE at Robert Schiele's site.

- I install that kernel module :

# rpm -Uvh squashfs-kmp-default-3.0_2.6.16.12_3-0.rs.200605040428.i586.rpm

Because I am using a different kernel version than the binary version, I copy that module to my current kernel version directory :

# cp /lib/modules/2.6.16.12-3-default/updates/squashfs.ko /lib/modules/2.6.16.13-4-default/misc/

- Make sure file /lib/modules/2.6.16.13-4-default/modules.dep has the following entry :

/lib/modules/2.6.16.13-4-default/misc/squashfs.ko:

- Next, I load squashfs module :

# /sbin/modprobe squashfs

- After that I remove squashfs kernel module :

# rpm -e squashfs-kmp-default

- I create a temporary working directory for SLAX module :

# mkdir /tmp/mod

- Unpack SLAX module :

Change to SLAX tools directory :

# cd slax/tools

Unpack to /tmp/mod directory :
# ./mo2dir ../base/01_kernel.mo /tmp/mod/

And here is the content of that SLAX module :

# ll
total 24
drwxr-xr-x 2 root root 4096 2006-05-06 18:04 boot
drwxr-xr-x 3 root root 4096 2006-05-06 18:04 etc
drwxr-xr-x 3 root root 4096 2006-08-22 00:46 lib
drwxr-xr-x 2 root root 4096 2006-05-22 22:44 sbin
drwxr-xr-x 9 root root 4096 2006-05-22 04:55 usr
drwxr-xr-x 3 root root 4096 2006-08-22 00:46 var

Then you can remove the packages you want. :D

TODO :
I need to find out how to remove packages installed on the SLAX module easily. Creating a script to do that is not an option. :D

Thursday, December 07, 2006

Customizing SLAX - part 1

I am currently learning about how to produce live Linux CD system. Yes I know, this may be very old and very simple for you. But I haven't sharpen my Linux skills since a year and half. This will be a good practise.

I chose SLAX (www.slax.org) because the manual said it was developed to be hacked. So here I am customizing SLAX.

In the first part of the customization, I will remove a SLAX module and add several modules (antivirus, wiping utilities, hash utilities). That's look very easy. :D

Here are the steps I took to do my objectives :

- Download the SLAX base from http://slax.linux-live.org

- Download the required modules from the above site. The modules I downloaded are :

- ClamAV 0.88.4
- md5deep_sha1deep
- wipe

- After finish download SLAX base and its module, I copy the whole SLAX base to my working directory :

# mount -t iso9660 -o loop slax-5.18.iso /media/images
# mkdir /home/tedi/projects/slax
# cp -R /media/images /home/tedi/projects/slax
# chown -R tedi.users /home/tedi/projects/slax/*

- Then I change to the SLAX directory :

$ cd projects/slax

- Remove kde_office.mo module

$ rm base/08_kde_office.mo

- Move three modules to modules/ directory :

$ mv ~/*.mo modules/

Here is the content of the modules/ directory :

-rw-r--r-- 1 tedi users 6758400 2006-12-06 12:11 ClamAV_0_88_4.mo
-rw-r--r-- 1 tedi users 118784 2006-12-06 11:37 md5deep_sha1deep_etc_1_12.mo
-rw-r--r-- 1 tedi users 40960 2006-12-06 11:37 wipe_0_20_1-1.mo

- After that I create a new SLAX iso :

$ ./make_iso.sh ../slax-new.iso
INFO: UTF-8 character encoding detected by locale settings.
Assuming UTF-8 encoded filenames on source filesystem,
use -input-charset to override.
mkisofs 2.01 (i686-suse-linux)
Scanning .
Scanning ./base
Scanning ./boot
Scanning ./boot/DOS
Excluded by match: ./boot/isolinux.boot
Scanning ./devel
Scanning ./modules
Scanning ./optional
Scanning ./rootcopy
Scanning ./tools
Scanning ./tools/WIN
Writing: Initial Padblock Start Block 0
Done with: Initial Padblock Block(s) 16
Writing: Primary Volume Descriptor Start Block 16
Done with: Primary Volume Descriptor Block(s) 1
Writing: Eltorito Volume Descriptor Start Block 17
Size of boot image is 4 sectors -> No emulation
Done with: Eltorito Volume Descriptor Block(s) 1
Writing: Joliet Volume Descriptor Start Block 18
Done with: Joliet Volume Descriptor Block(s) 1
Writing: End Volume Descriptor Start Block 19
Done with: End Volume Descriptor Block(s) 1
Writing: Version block Start Block 20
Done with: Version block Block(s) 1
Writing: Path table Start Block 21
Done with: Path table Block(s) 4
Writing: Joliet path table Start Block 25
Done with: Joliet path table Block(s) 4
Writing: Directory tree Start Block 29
Done with: Directory tree Block(s) 11
Writing: Joliet directory tree Start Block 40
Done with: Joliet directory tree Block(s) 10
Writing: Directory tree cleanup Start Block 50
Done with: Directory tree cleanup Block(s) 0
Writing: Extension record Start Block 50
Done with: Extension record Block(s) 1
Writing: The File(s) Start Block 51
5.51% done, estimate finish Wed Dec 6 23:23:06 2006
11.03% done, estimate finish Wed Dec 6 23:23:15 2006
16.55% done, estimate finish Wed Dec 6 23:23:30 2006
22.05% done, estimate finish Wed Dec 6 23:23:28 2006
27.56% done, estimate finish Wed Dec 6 23:23:27 2006
33.08% done, estimate finish Wed Dec 6 23:23:30 2006
38.58% done, estimate finish Wed Dec 6 23:23:29 2006
44.10% done, estimate finish Wed Dec 6 23:23:30 2006
49.60% done, estimate finish Wed Dec 6 23:23:32 2006
55.13% done, estimate finish Wed Dec 6 23:23:33 2006
60.63% done, estimate finish Wed Dec 6 23:23:34 2006
66.15% done, estimate finish Wed Dec 6 23:23:36 2006
71.65% done, estimate finish Wed Dec 6 23:23:35 2006
77.17% done, estimate finish Wed Dec 6 23:23:37 2006
82.67% done, estimate finish Wed Dec 6 23:23:37 2006
88.19% done, estimate finish Wed Dec 6 23:23:37 2006
93.69% done, estimate finish Wed Dec 6 23:23:36 2006
99.20% done, estimate finish Wed Dec 6 23:23:37 2006
Total translation table size: 2048
Total rockridge attributes bytes: 7043
Total directory bytes: 18432
Path table size(bytes): 134
Done with: The File(s) Block(s) 90525
Writing: Ending Padblock Start Block 90576
Done with: Ending Padblock Block(s) 150
Max brk space used 0
90726 extents written (177 MB)

- To test the new iso, I use "qemu" :

$ cd
$ qemu -cdrom slax-new.iso -boot d

- When the new SLAX started, I login and check whether the new modules are there, and yes they are.

- Time to celebrate.... :d

In the next installment, I will try to modify existing modules and add several more application to SLAX.

Until next time

Wednesday, November 08, 2006

Resize Images Using convert

A friend of mine has a lot of images. Those images are very beautiful. Unfortunately I found out that the image size was very big. One of them has 2592x1944 pixels dimension and of course the size is gigantic (1MB) (!).

I remembered sometimes ago I played a little bit with "convert", an application to :

convert between image formats as well as resize an image,
blur, crop, despeckle, dither, draw on, flip, join, re-sample, and much more.

Convert is a tool available in ImageMagick package.

So here is the command to resize that big image :

convert -resize 648x486 Picture\ 021.jpg Picture\ 021a.jpg

Notes :

- For -resize option you can give whatever argument suitable for that image. I resize the image to a quarter of its origin dimension.

- I resized the image to another file, just in case the result is not good enough I can always revert to the original file.

The convertion process will take sometime depends on your computer speed.

The gigantic image now becomes a smaller image (its size only 71.5KB).

Wednesday, September 06, 2006

Creating PDF from PS files

Several years ago, I wrote a thesis about Elliptic Curve Cryptography. At that time, I splitted the files by chapter, so I have chapter 1-5. And these files were in PS format.

Yesterday, I decided to convert those files to PDF.

Here is how I do the conversion :

First I used ps2pdf program to convert PS to PDF files :

$ ps2pdf13 ch01.ps

and so on.

I found out that chapter 1,3 and 5 contain one empty page. So I removed the empty page on the last page using pdftk program :

$ pdftk ch01.pdf cat 1-3 output ch01-new.pdf
$ pdftk ch03.pdf cat 1-13 output ch03-new.pdf
$ pdftk ch05.pdf cat 1-2 output ch05-new.pdf


Then I concatenatted those 5 PDF files into one big file (ecc-thesis.pdf) :

$ pdftk ch01-new.pdf ch02.pdf ch03-new.pdf ch04.pdf ch05-new.pdf output ecc-thesis.pdf

Wednesday, August 16, 2006

Creating Snort-Inline RPM in OpenSUSE 10.1

I couldn't install snort-inline, because it needs libnet 1.0.2a. In my system I have already installed libnet 1.1.0 required by dsniff-2.4.0. This silly problem made me crazy for several days.

Finally I got an enlightenment.

First, make sure you've installed iptables-devel package.

To resolve this problem, I downgraded dsniff to dsniff-2.3-1.guru.suse100
(http://rpm.pbone.net) and removed libnet 1.1.0.

# rpm -e dsniff-2.4.0
# rpm -Uvh dsniff-2.3-1.guru.suse100.i686.rpm
Preparing... ########################################### [100%]
1:dsniff ########################################### [100%]
# rpm -e libnet


Then I install libnet-1.0.2a-1.snort :

# rpm -Uvh libnet-1.0.2a-1snort.i386.rpm
Preparing... ########################################### [100%]

1:libnet ########################################### [100%]


After that I create snort RPMS :

$ rpmbuild -tb snort-2.6.0.tar.gz --with inline --with mysql
...

Wrote: /home/tedi/rpms/RPMS/i586/snort-inline-2.6.0-1.i586.rpm

Wrote: /home/tedi/rpms/RPMS/i586/snort-inline-mysql-2.6.0-1.i586.rpm

...

Nessus 3.03 in OpenSUSE 10.1

Several days ago, I installed Nessus on my machine (OpenSUSE 10.1). From the website, I didn't find Nessus package for my machine, instead I downloaded packages for SUSE 10.

The installation was a breeze :

# rpm -Uvh Nessus-3.0.3-suse10.0.i586.rpm
Preparing... ########################################### [100%]
1:Nessus ########################################### [100%]


nessusd (Nessus) 3.0.3. for Linux

(C) 1998 - 2006 Tenable Network Security, Inc.


Processing the Nessus plugins...

[##################################################]


All plugins loaded


- Please run /opt/nessus//sbin/nessus-add-first-user to add an admin user
- Register your Nessus scanner at http://www.nessus.org/register/
to obtain
all the newest plugins
- You can start nessusd by typing /etc/rc.d/nessusd start


After that, I just followed what has been instructed on the installation.

# /opt/nessus/sbin/nessus-add-first-user
Using /var/tmp as a temporary file holder


Add a new nessusd user
----------------------

Login : admin
Authentication (pass/cert) [pass] :
Login password :

Login password (again) :


User rules
----------


nessusd has a rules system which allows you to restrict the hosts

that admin has the right to test. For instance, you may want

him to be able to scan his own host only.


Please see the nessus-adduser(8) man page for the rules syntax


Enter the rules for this user, and hit ctrl-D once you are done :
(the user can have an empty rules set)


Login : admin

Password : ***********

DN :

Rules :


Is that ok ? (y/n) [y]

user added.

Thank you. You can now start Nessus by typing :

/opt/nessus//sbin/nessusd -D


I start Nessus :

# /etc/init.d/nessusd start

After that I installed the client, apparently now they separated Nessus server and client :

# rpm -Uvh NessusClient-1.0.0.RC5-suse10.0.i586.rpm
Preparing... ########################################### [100%]
1:NessusClient ########################################### [100%]


Then I checked my computer using NessusClient :

$ /opt/nessus/bin/NessusClient

Thursday, July 13, 2006

View CHM Files in OpenSUSE 10.1

To be able to view chm files in OpenSUSE 10.1 you need to install the following software packages :

chmlib-0.37.4-1.i586.rpm
compat-expat1-1.95.8-6.i586.rpm

expat-2.0.0-13.i586.rpm

libmspack-0.0.20040308alpha-16.i586.rpm

wxGTK-2.6.1.0-4.i586.rpm

xchm-1.2-1.i586.rpm


You can find those packages in http://rpm.pbone.net


After success download those files, just install them :


# rpm -Uvh *.rpm


Enjoy

Friday, June 16, 2006

Playing DVD in OpenSUSE 10.1

The default xine and xine-lib packages provided by SUSE 10.1 can't be used to play DVD. So you need to uninstall them and install the following packages :

  • libxine1-1.1.2cvs-060514.i586.rpm
  • xine-ui-0.99.4cvs-051003.i586.rpm
  • libdvdcss2-1.2.9-1.i386.rpm
  • w32codec-0.52-1.i386.rpm
You can find those packages at http://packman.link2linux.org

After that you can enjoy watching DVDs. :D

Playing MP3 Files in OpenSUSE 10.1

The default XMMS Library provided by OpenSUSE 10.1 doesn't have MP3 capabilities. In other words, you can't play MP3 files using the default XMMS library installed by OpenSUSE 10.1.

To solve the problem, I installed XMMS Library from http://packman.links2linux.org

Here is the filename :

xmms-lib-1.2.10-103.pm.1.i586.rpm

To install it, just use the following command :

# rpm -Fvh xmms-lib-1.2.10-103.pm.1.i586.rpm


After that command run without errors, you can play MP3 files.

Monday, April 17, 2006

Another Webserver Performance Tool : autobench

In my last blog, I wrote about httperf. This time I will write about another tool. The tool
is autobench. It is a wrapper for httperf.

To install autobench, just do the followings :

$ make
# make install


To run it, type :

$ autobench
Autobench configuration file not found
- installing new copy in /home/tedi/.autobench.conf

Installation complete - please rerun autobench

I use the example from autobench website :

$ autobench --single_host --host1 localhost --uri1 /index.html --quiet --low_rate 20 --high_rate 200 --rate_step 20 --num_call 10 --num_conn 5000 --timeout 5 --file result.tsv

Will benchmark "localhost/index.html", with a series of tests starting at 20 connections per second (with 10 requests per connection), and increasing by 20 connections per second until 200 connections a second are being requested.

Each test will comprise a total of 5000 connections, and any responses which took longer than 5 seconds to arrive will be counted as errors. The results will be saved in the file 'result.tsv'.


And here is the result :

dem_req_rate req_rate_localhost con_rate_localhost min_rep_rate_localhost avg_rep_rate_localhost max_rep_rate_localhost stddev_rep_rate_localhost resp_time_localhost net_io_localhost errors_localhost
200 200.0 20.0 200.0 200.0 200.0 0.0 0.1 814.0 0
400 400.1 40.0 400.0 400.0 400.0 0.0 0.1 1628.0 0
600 600.1 60.0 600.0 600.0 600.1 0.0 0.1 2442.0 0
800 800.1 80.0 800.0 800.1 800.1 0.0 0.1 3256.1 0
1000 1000.2 100.0 1000.0 1000.1 1000.1 0.0 0.1 4070.0 0
1200 1200.2 120.0 1200.0 1200.1 1200.1 0.0 0.1 4884.0 0
1400 1400.3 140.0 1400.0 1400.1 1400.1 0.1 0.1 5698.1 0
1600 1600.3 160.0 1600.0 1600.1 1600.1 0.1 0.1 6512.0 0
1800 1800.2 180.0 1800.0 1800.1 1800.1 0.1 0.1 7325.7 0
2000 2000.3 200.0 1999.9 2000.1 2000.1 0.1 0.1 8139.8 0

Testing Web Performance with httperf

I got another tool for testing webperformance. This tool is httperf. It was developed by David Mosberger from HP.

The installation process is very smooth and usual :

$ ./configure
$ make

# make install


Next I try httperf to issue 1000 HTTP requests :

$ httperf --server localhost --port 80 --num-conns 100 --rate 10 --timeout 2

The above command will create 100 connections during 10 seconds (1000 requests).

Here is the result (it is not pretty) :

Total: connections 100 requests 100 replies 100 test-duration 9.901 s

Connection rate: 10.1 conn/s (99.0 ms/conn, <=1 concurrent connections)
Connection time [ms]: min 0.1 avg 0.3 max 15.0 median 0.5 stddev 1.5
Connection time [ms]: connect 0.0
Connection length [replies/conn]: 1.000

Request rate: 10.1 req/s (99.0 ms/req)
Request size [B]: 60.0

Reply rate [replies/s]: min 10.0 avg 10.0 max 10.0 stddev 0.0 (1 samples)
Reply time [ms]: response 0.3 transfer 0.0
Reply size [B]: header 217.0 content 3880.0 footer 0.0 (total 4097.0)
Reply status: 1xx=0 2xx=100 3xx=0 4xx=0 5xx=0

CPU time [s]: user 0.38 system 9.50 (user 3.9% system 95.9% total 99.8%)
Net I/O: 41.0 KB/s (0.3*10^6 bps)

Errors: total 0 client-timo 0 socket-timo 0 connrefused 0 connreset 0
Errors: fd-unavail 0 addrunavail 0 ftab-full 0 other 0


I leave the interpretation of the above statistics to the readers.